

Single Sign-On (SSO)
Single Sign-On (SSO)
Single sign-on lets the members of your organization sign in to Kurrent Cloud with the credentials they already use at work, managed by your own identity provider (IdP). Instead of maintaining a separate Kurrent Cloud password, users authenticate against your IdP, and your IdP decides who is allowed in.
Kurrent Cloud supports the SAML 2.0 and OpenID Connect (OIDC) protocols, so you can connect identity providers such as Okta, Microsoft Entra ID (Azure AD), Google Workspace, OneLogin, JumpCloud, and any other SAML- or OIDC-compliant provider.
Tips
SSO is configured per organization, from Access control → Settings. Each organization has its own connection, and its members sign in through it.
How it works
Setting up SSO is a two-step process, shown under Single Sign-On on the Access control → Settings page:
- Verify your domain — prove ownership of the email domain your members sign in with. This must be completed first; an SSO connection cannot be activated until the domain is verified.
- Configure SSO — connect your identity provider over SAML or OIDC.
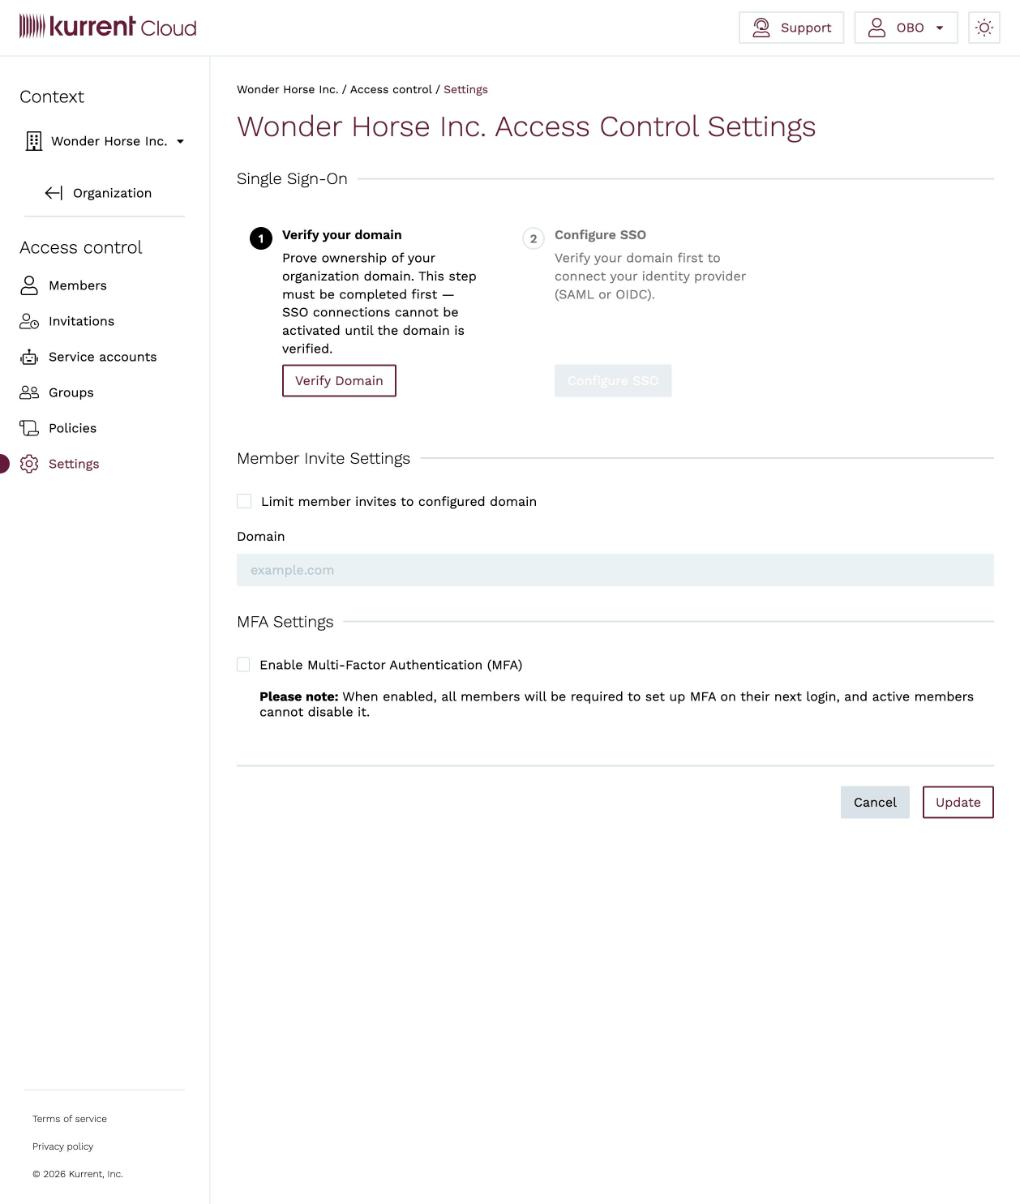
Once SSO is active, a member who signs in with an address on the verified domain is redirected to your identity provider to authenticate. On their first successful sign-in, a member account is provisioned automatically and added to the organization.
Prerequisites
Before you start, make sure you have:
- Organization admin access in Kurrent Cloud (membership of the
Organization adminsgroup). - Administrator access to your identity provider, so you can create an application/connection and exchange configuration with Kurrent Cloud.
- A domain you can verify — the email domain your members will sign in with, and the ability to add a DNS record for it.
Step 1 — Verify your domain
Open the Access control menu for your organization and select Settings.
Under Single Sign-On, click Verify Domain. A guided setup portal opens in a new tab.
Enter your organization domain (for example
your-company.com) and click Continue.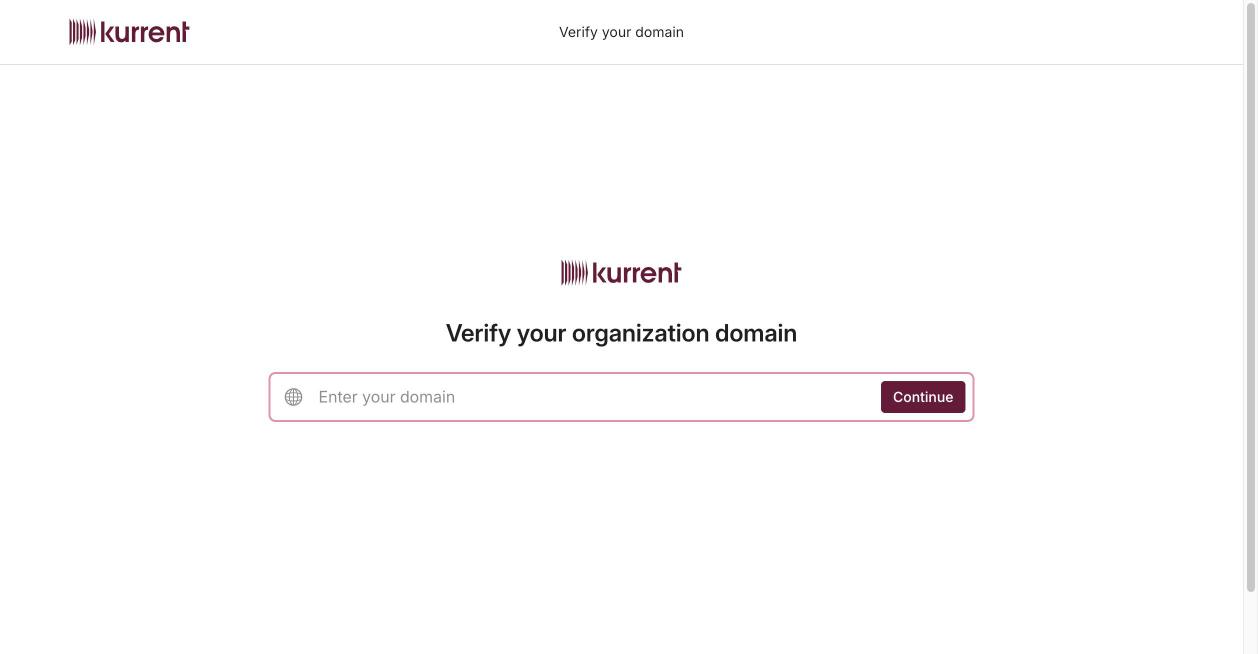
Verify your organization domain Add the DNS record the portal provides to your domain's DNS zone, then return to the portal to complete verification.
Once the domain is verified, the Configure SSO step is enabled.
Step 2 — Configure SSO
- Back on Access control → Settings, under Single Sign-On, click Configure SSO. The guided setup portal opens.
- Choose your identity provider (or a generic SAML or OIDC connection).
- Follow the wizard to exchange configuration between Kurrent Cloud and your IdP:
- Create the corresponding application/connection in your identity provider.
- Provide Kurrent Cloud's ACS URL / redirect URI and entity ID / client credentials to your IdP, and provide your IdP's metadata URL (or certificate and sign-in URL) back to Kurrent Cloud.
- Map the identity attributes your IdP sends (email, first name, last name) to the fields Kurrent Cloud expects.
- Complete the wizard. When the exchange succeeds, the connection becomes active and members on the verified domain are routed to your IdP at sign-in.
Related settings on this page
The same Access control → Settings page has two related controls:
- Member Invite Settings — enable Limit member invites to configured domain to require that invited members use an address on your domain.
- MFA Settings — enable multi-factor authentication for all members of the organization.
Sign-in experience
After SSO is active, members sign in from the Cloud console with their work email address. Kurrent Cloud recognizes the verified domain and redirects them to your identity provider. New members are provisioned on their first successful sign-in and added to the organization.
Tips
Newly provisioned members start with the default access of the organization. Add them to the appropriate groups so they receive the permissions they need.
Manage or remove a connection
From Access control → Settings you can re-open the guided setup to update identity provider metadata or attribute mappings — for example after rotating a signing certificate in your IdP — or remove the connection to disable SSO.
Warning
Removing the SSO connection stops members from signing in through your identity provider. Make sure at least one organization admin can still sign in with another method before you remove a connection, so you don't lock yourself out.
Troubleshooting
Configure SSOis disabled — verify your domain first. The connection cannot be configured until domain ownership is confirmed.- Members are not routed to your IdP — check that their email domain matches the verified domain and that verification completed.
- Sign-in fails immediately — confirm the ACS URL / redirect URI and entity ID / client ID in your identity provider exactly match the values shown in the setup wizard.
- "Attribute missing" or empty profile — verify that your identity provider sends the email, first name, and last name attributes and that they are mapped in the wizard.
- Certificate errors after a while — SAML signing certificates expire. Re-open the setup and update the connection with the new certificate or metadata URL from your IdP.